What services do you offer?
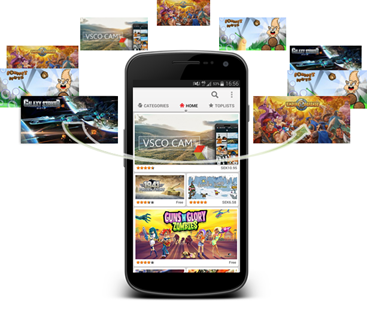
Your store on Android
On an Android device you can view your store both as a web service and a native downloadable Android App. To view the web version of your store on Android click here in your smarphone.
How to download and install your store on Android
Download your native Android App Store from your Web Store. Try it on your computer, tablet and smartphone to see how the web store adjusts to different devices and orientations (horizontal/vertical).
To download the native Android App Store, go to the start page of your Web Store in your Android smartphone and click on "Download App Store" right under the sliding banner. Follow the on-screen instructions to install it
Your store on iPhone
On an iPhone you can view your store as a web service. Due to Apples rules it is not possible to have a downloadable app. Instead the web service act as a recommendation service for apps helping your customers to discover new apps. To view your store on an iPhone click here in your internet browser on your phone.

Next Step
Modify services do you offer?
Manage the zones of the native Android App Store, the iOS recommendation service and the Web Store
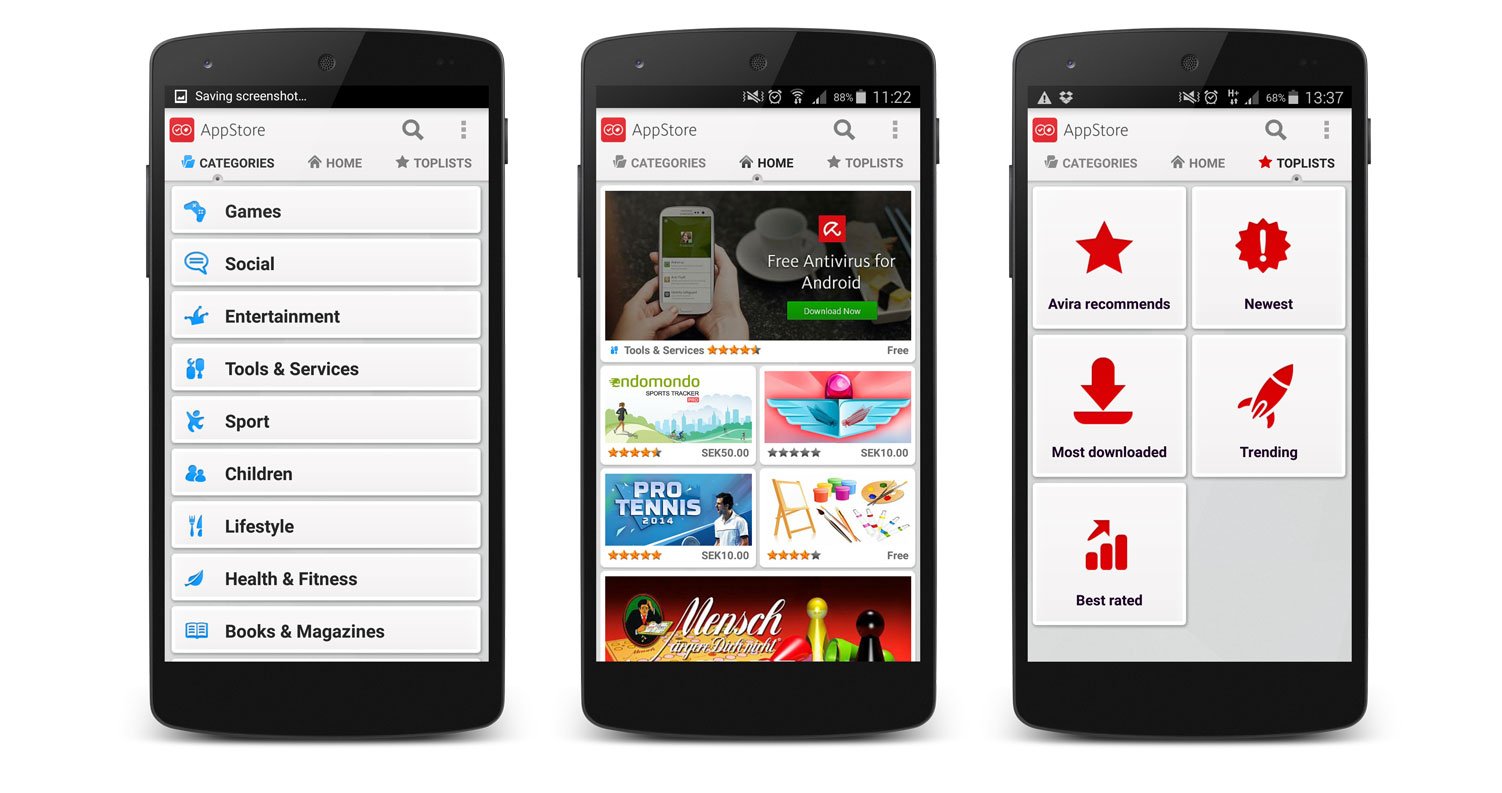
The different zones you can manage
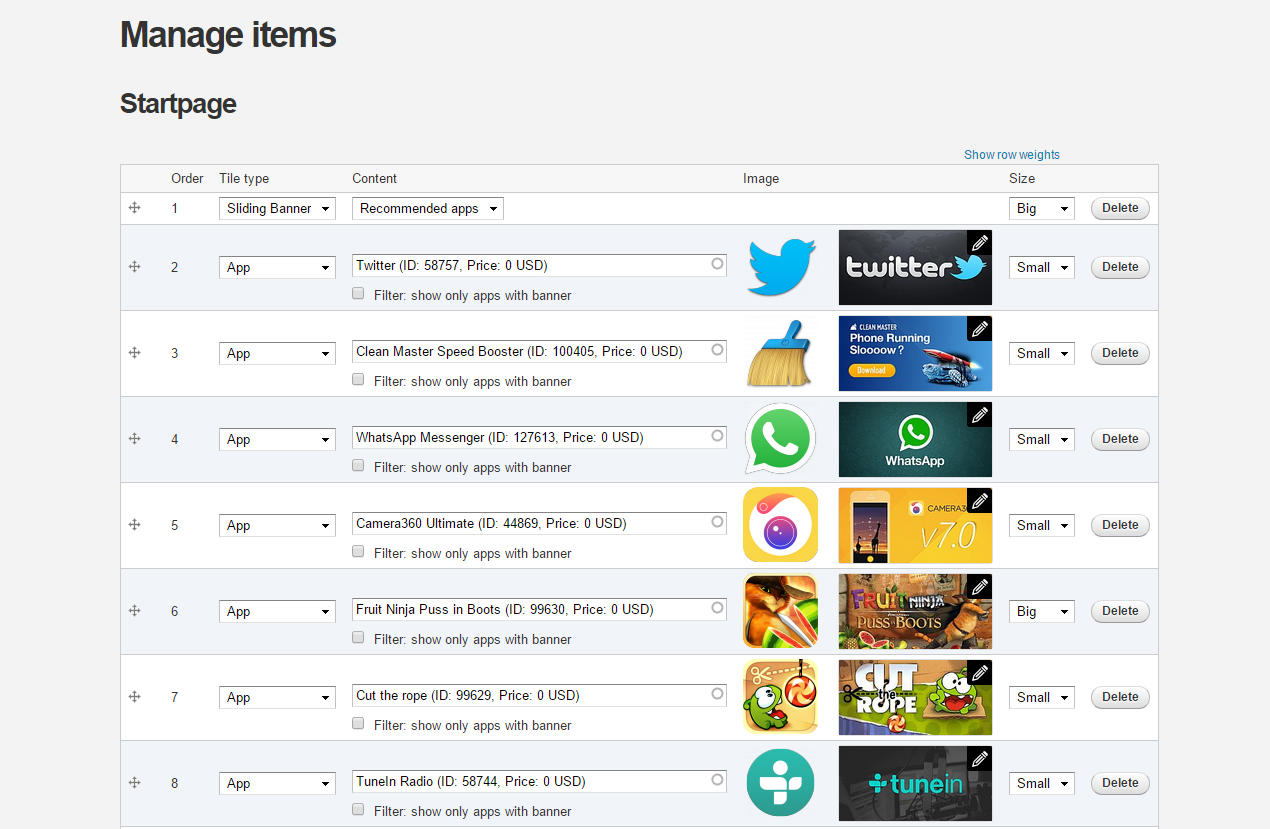
The Start Page is the first page your users will see when opening the native Android App Store. We recommend to feature quality apps and change these apps frequently to increase retention among your users.
Either feature your own recommended apps list in the App Store's Toplists Page or choose between several pre-defined lists as My friends apps, Newest apps, Most downloaded, Trending Apps and Apps near.
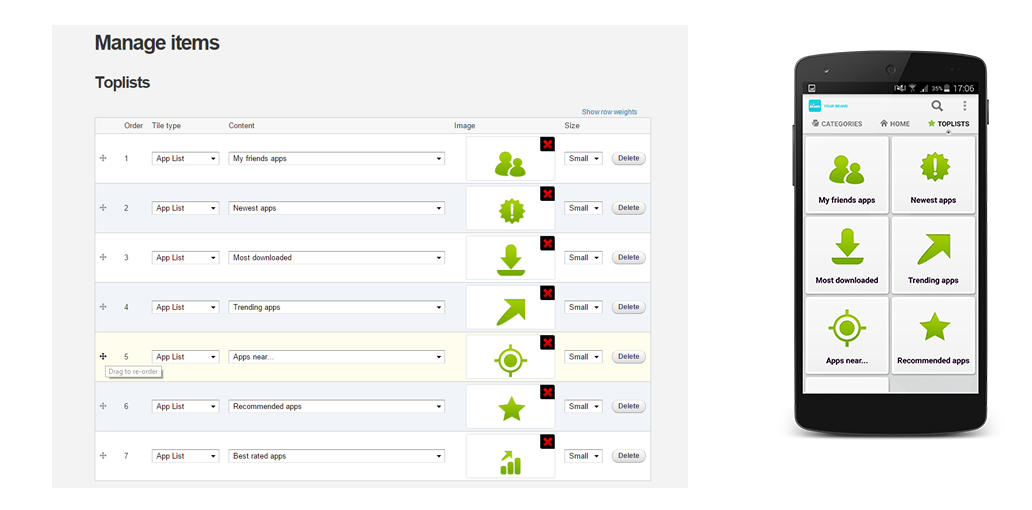
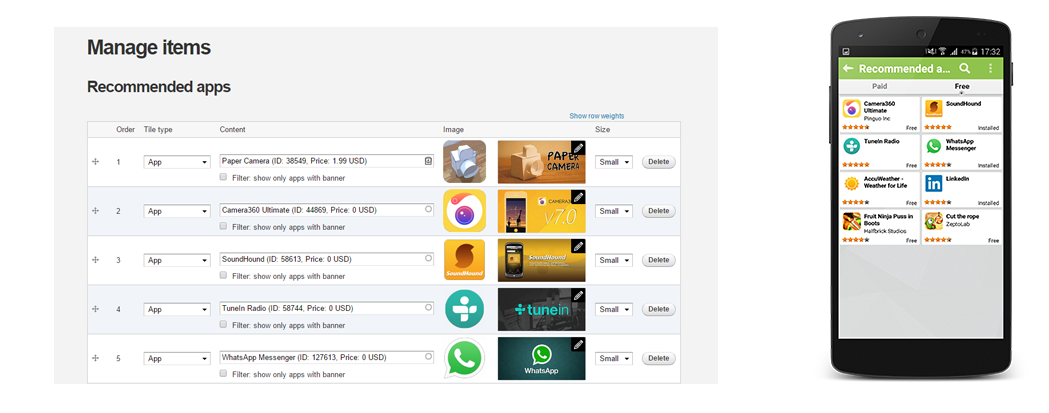
You can create your own Recommended Apps List in the native Android App Store, this feature is valuable if you want to highlight apps that you know will bring extra value to your users.
The Sliding Banner is a list that you can pre-define and feature on the Start Page. The list is dynamic and will slide every third second, this list will increase the discovery of apps.
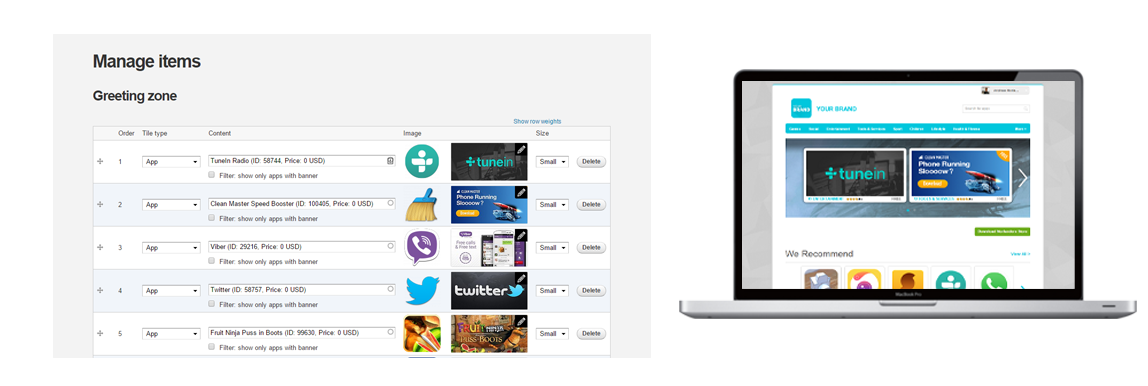
The Greeting Zone is the Sliding banner on the top in the Web Store, unlike the Sliding banner in the native Android App Store that slides every third second, this one requires action by the user
Elements you can add
On the Startpage you can choose to either feature an App, a pre-defined App List, a Web Link, a Sliding Banner or a Web Tile.
Apps that are featured on the start page will get more downloads, and these apps are the first thing your users will see. We recommend to feature quality apps and change these apps frequently to increase retention among your users
Feature a pre-defined App List, e.g. “New Apps” so that your users easily can discover what’s new in the store.
Sliding banner is a function where you can feature unlimited numbers of apps and create a dynamic User Experience to increase discovery
With the Web Link function you can add an URL to a tile so that you easily can cross promote other services, e.g. your website.
Stand out from the crowd by featuring a customized Web Tile. With this function you’re able to add HTML and JavaScript code to a tile.
Previous StepNext Step
Add apps to the store
Upload apps to your store
Send your apps with meta data to andreas.norlander@applandinc.com and I will do the job for you!
Meta data includes:
Icon 512 x 512
Description
Promo Image 1024 x 500 (optional)
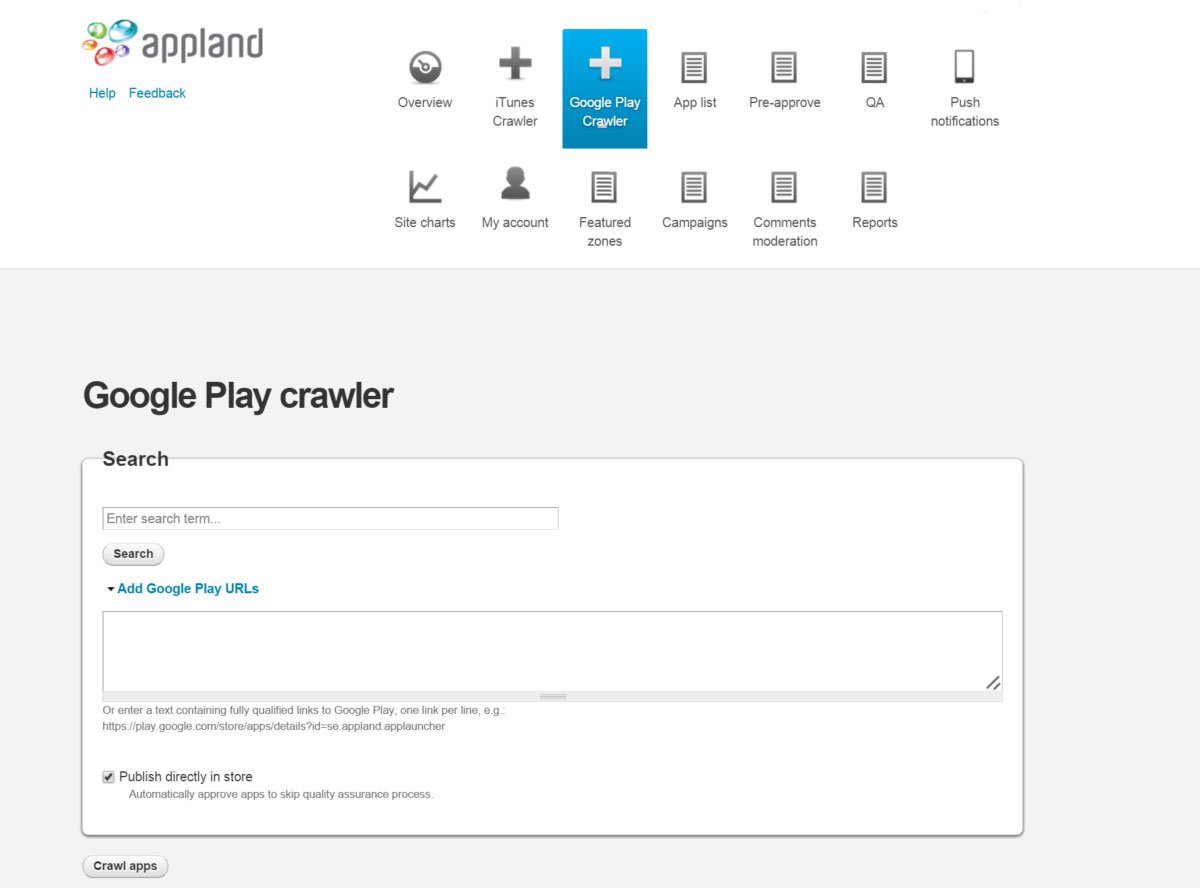
Google Play Crawler
Are your users searching for apps in your store that you haven't acquired yet? Easily add apps hosted at Google Play in the meantime while your acquiring new fresh content. By doingt this you will extend your content offer.
Add Android apps hosted a Google Play to your native Android App Store and Web Store by either searching for it or by entering Google Play URLs e.g. https://play.google.com/store/apps/details?id=se.appland.applauncher. Appland's Google Play Crawler fetches meta data from Google Play and when your users clicks on the app in the store they will get re-directed to Google Play, where the actual download occurs.
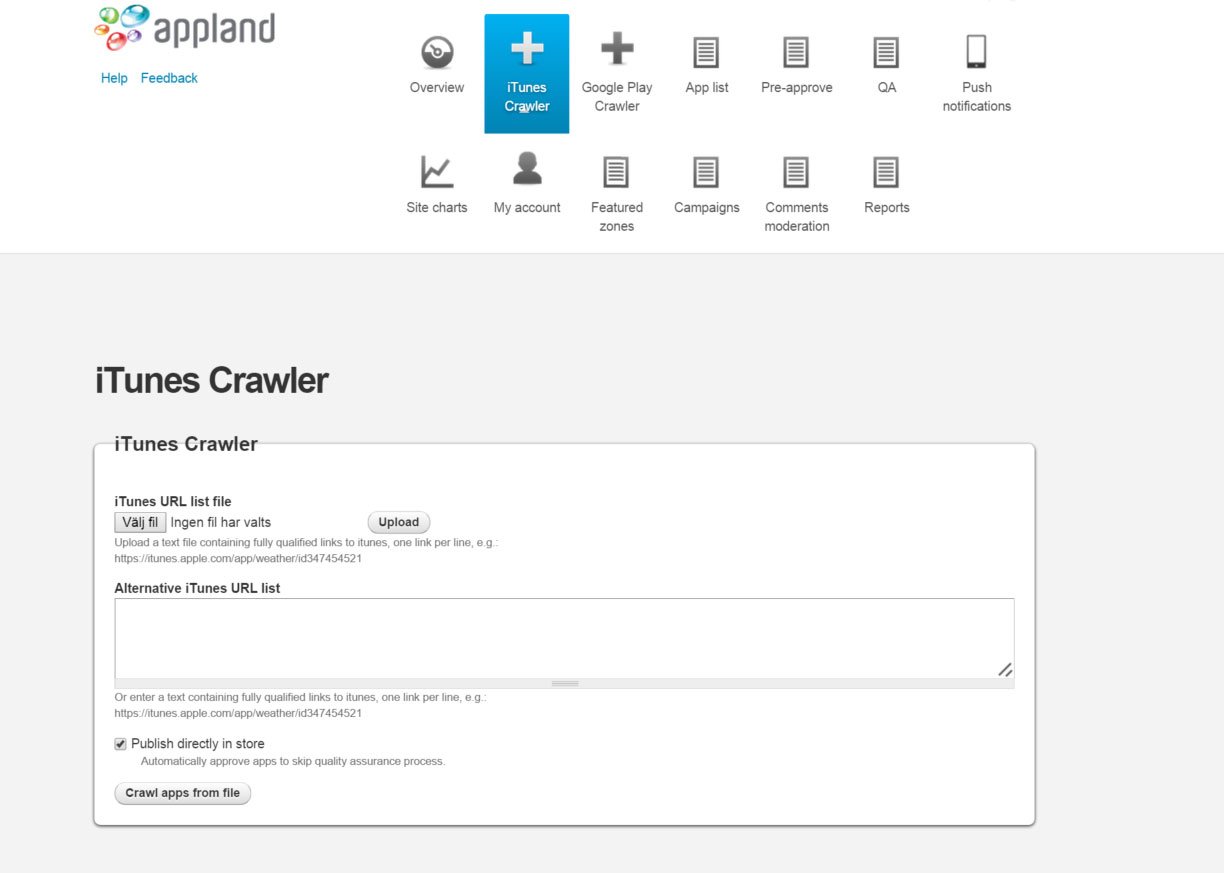
iTunes Crawler
Add iOS apps hosted at iTunes to your iOS recommendation service by uploading a list containing URLs to iTunes e.g https://itunes.apple.com/app/weather/id347454521. Appland’s iTunes Crawler fetches meta data from iTunes and when your users clicks on the app in the iOS recommendation service they will get re-directed to iTunes, where the actual download occurs.
Previous StepNext Step
Review and Approve apps for your store
Configure your review and approval process the way you want it, either no step, one step or two step. By not having any steps at all, all apps that are submitted to the store will be published directly. By having one step, a Quality assurance team can review and approve the apps before getting published. We recommend a 2 step process, where a team in step 1 only checks the meta-data of the app and then in step 2 makes sure that the functionality of the app is perfect before getting published.
Find Apps
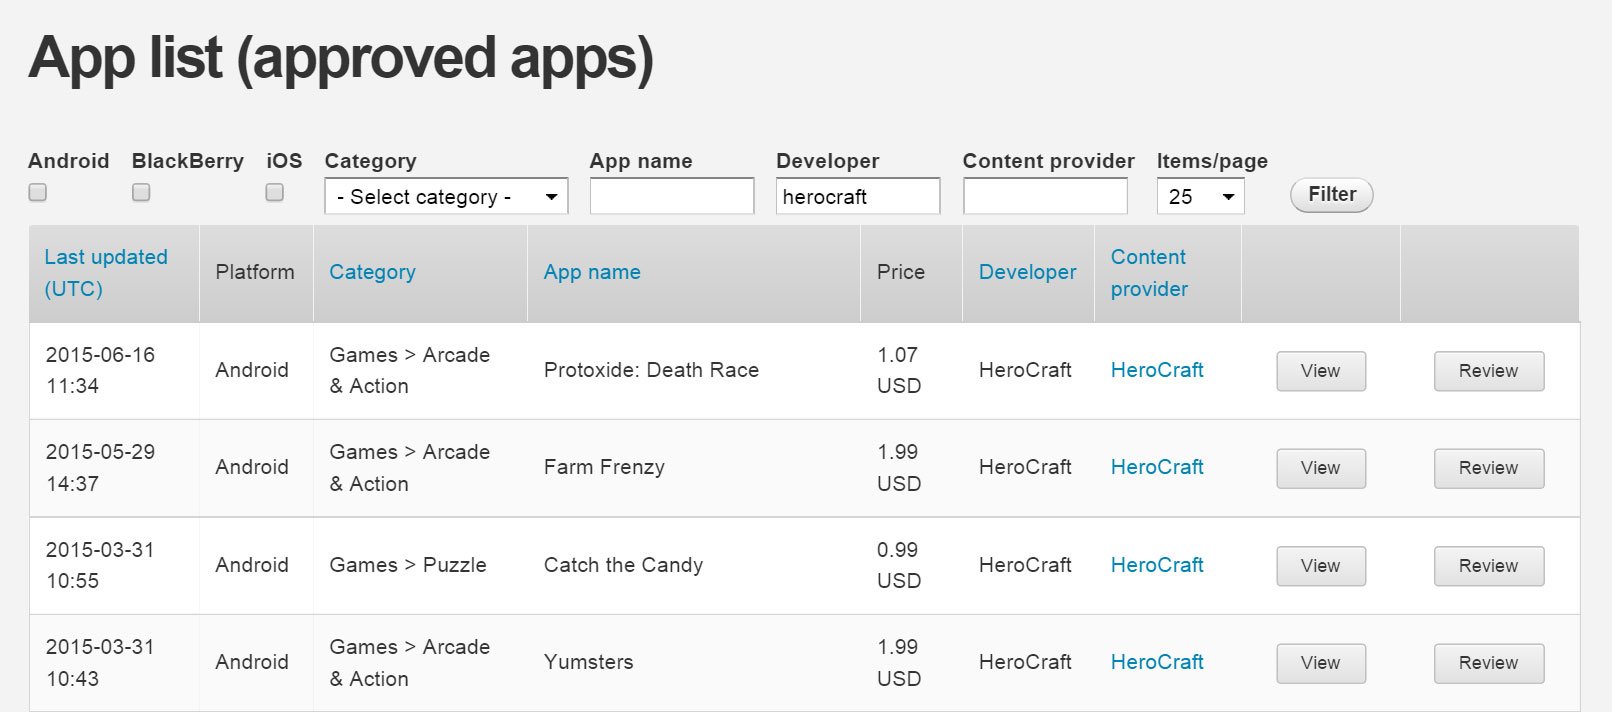
You can view all apps that are approved by the Store Manager and live in the app store by clicking the menu item “App List”. You can filter out a subset of live apps by selecting platform and/or category. You can also search for specific apps based on part of title, developer or names of content providers.
See details about the content providers by clicking a content provider name. The “Review” button will display the apps detail page where you can change category and status of the app (Approved, Not Approved or Not Reviewed)
Pre approve apps
The platform supports two review steps: Pre-approve and QA. The pre-approve step is made for assurance of the metadata (text and pictures). This is the first step for any app submitted to an app store. Filter by platform, category or search for specific apps, developers or content providers. The first step of reviewing an app is to click “Review” of the app you wish to approve:
When you have clicked “Review”:
The “Log” displays all events (new APK-files that have been uploaded, etc) since the developer uploaded the app to the app store.
Change the approval status by checking “Approved” or “Not approved”.
For “Approved” status, the app can be sent to the next review step (Pre-approved only) or live directly (Fully approved).
For “Not approved”, “Pending” can be chosen which will alert the developer that a new, better version needs to be uploaded before it goes live.
If “Rejected”, the app will be locked and will be neither updated nor shown in the store.
Previous StepNext Step
Communicate with your App Store users - Push Notifications
Communicate with your App Store users
Communication to your users increase their activity and retention rate.
The push notification system can be used to perform many different tasks:
Cross-promotion of your other apps or web sites
Communication platform to a specific group within your end user segment
Promote apps, top lists, etc. within your app store.
Click the “Push notification” button to manage and send push notifications to end users. Send to specific platforms, end users or devices
Choose platform (Android and/or iOS).
Manage notification content (title/message).
Select an action to occur when the notification is clicked (e g, “Go to App detail”: Find the App id on e.g. http://www.IKEA.applandstore.com/, click on the app that should be displayed for the end user, the App id is in the URL: http://www.IKEA.applandstore.com/en/app/1501 (1501 is the app id.) Paste the App ID in the box).
Choose which devices to send push messages to (Check “Send to all” box if push should be sent to all end users or upload a device list containing specific end users/devices)
Example of push notification. One of our clients used our push notification system to cross promote a Web Survey, they hade never before received so many submissions. The push notification system is a powerfull tool and can be used in many ways
.png)
Previous StepNext Step
Build campaigns to drive activity
Build campaigns to drive activity
Create your own campaigns to increase activity and retention rate among your users, offer a Premium App for free or a In-app Purchase for free.
You don't have to contact the developer to create a campaign to give away apps for free, in the back-end the download will be administrated as a purchase. But, this means that you as a Store Owner will pay for the campaign.
You can also contact the developer to create a campaign together. E.g. the developer will offer an In-app purchase in his app for free in exchange fro promotion. This will lead to usage of his app and you as a Store Owner will increase activity and retention among your users.
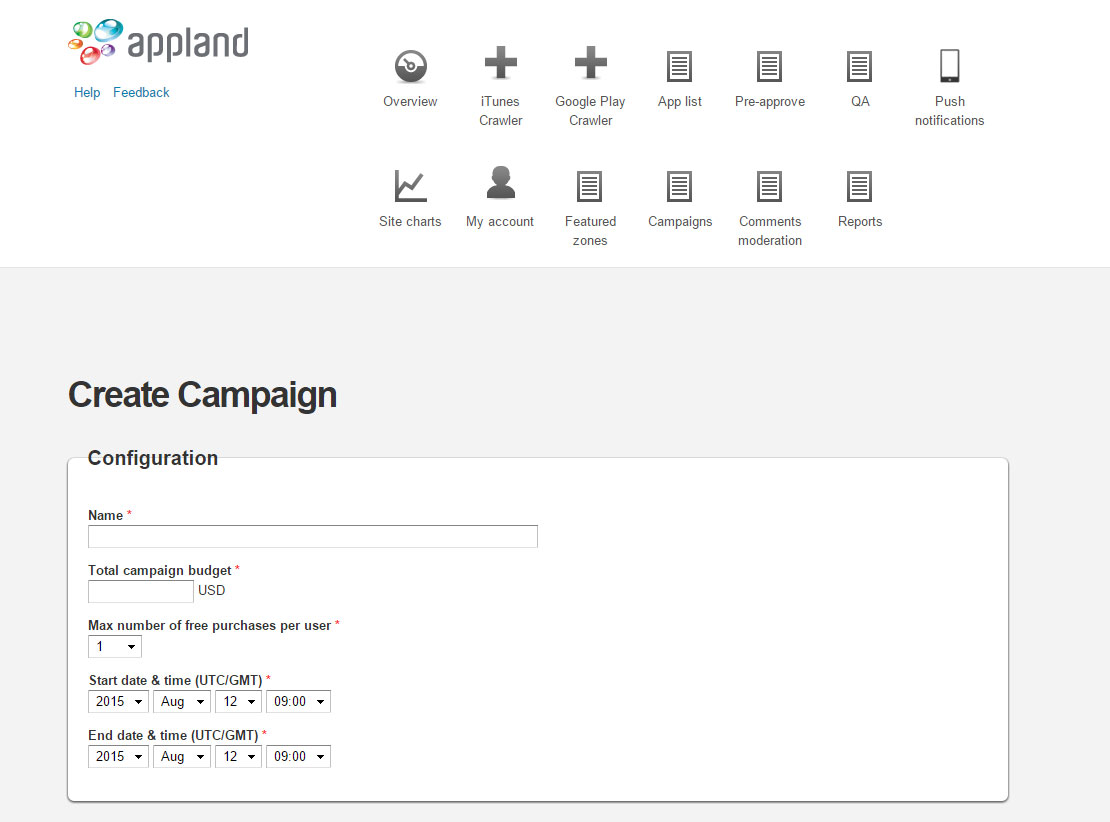
The campaign system can be configured by the following options:
Name
Total Campaign budget
Max number of free purchases per user
Start date & time/End date & time
Campaing type, Free Premium Apps or Free In-app Purchase
Previous StepNext Step
Statistics - Get to know your user base
Site Charts
By analysing the behaviors of your users, you can understand them better.
Get statistics of new users, purchases, downloads, end user activity, end user devices and end user retention.
It is possible to select a date range and display data per day, week, month or accumulated.
What gets meassured, gets managed - Peter Ducker:
Reports
All downloads, purchases, uploaded content and installations of the mobile app store are saved as reports.
You can view, filter and download these detailed reports.
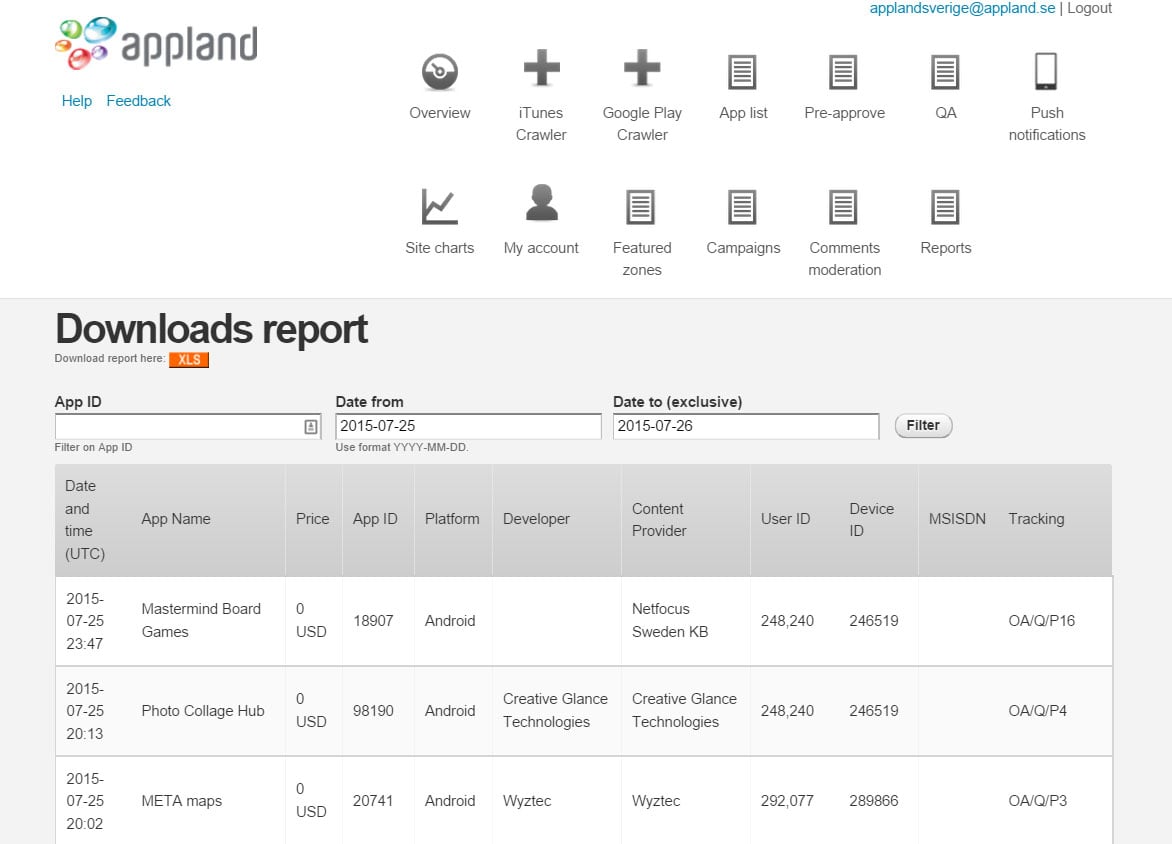
“Downloads report”
By analyzing the download and purchase report you can understand which content that is popular among your users. This information will be helpfull when it's time to acquire new content
Detailed info about all downloads made from the app store.
Add the specific App ID to view every download of a specific app.
Filter to view downloads made during a specific period.
View the report in the browser or download it by clicking “XLS” (Orange box).
“Purchase reports”
Detailed info about all purchases made through the app store.
Filter to view downloads made during a specific period.
View the report in the browser or download it by clicking “XLS” (Orange box).
“Content reports”
Detailed info about all applications submitted to the app store.
“Device reports”
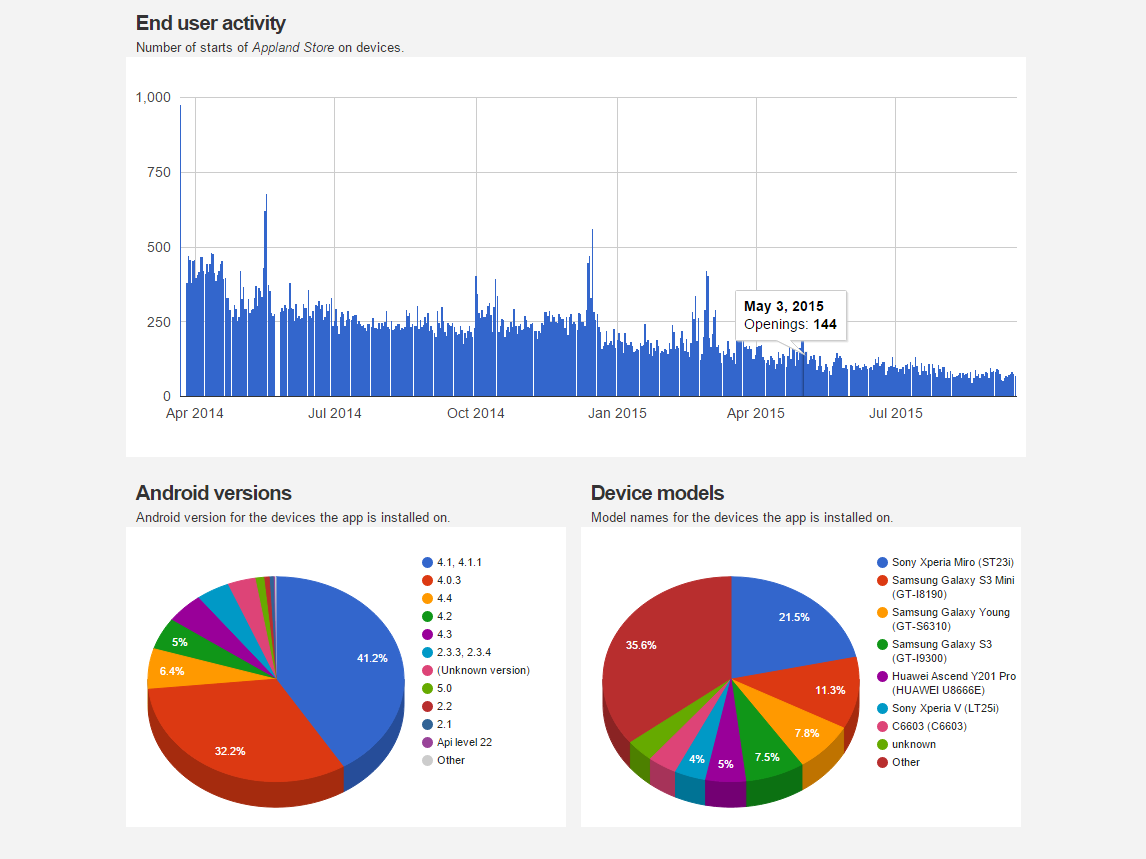
By analyzing this report you can understand on which devices your App Store is being used
Detailed info about all devices that have downloaded the mobile app store
View the report in the browser or download the report by clicking “XLS” (Orange box)
Previous StepNext Step
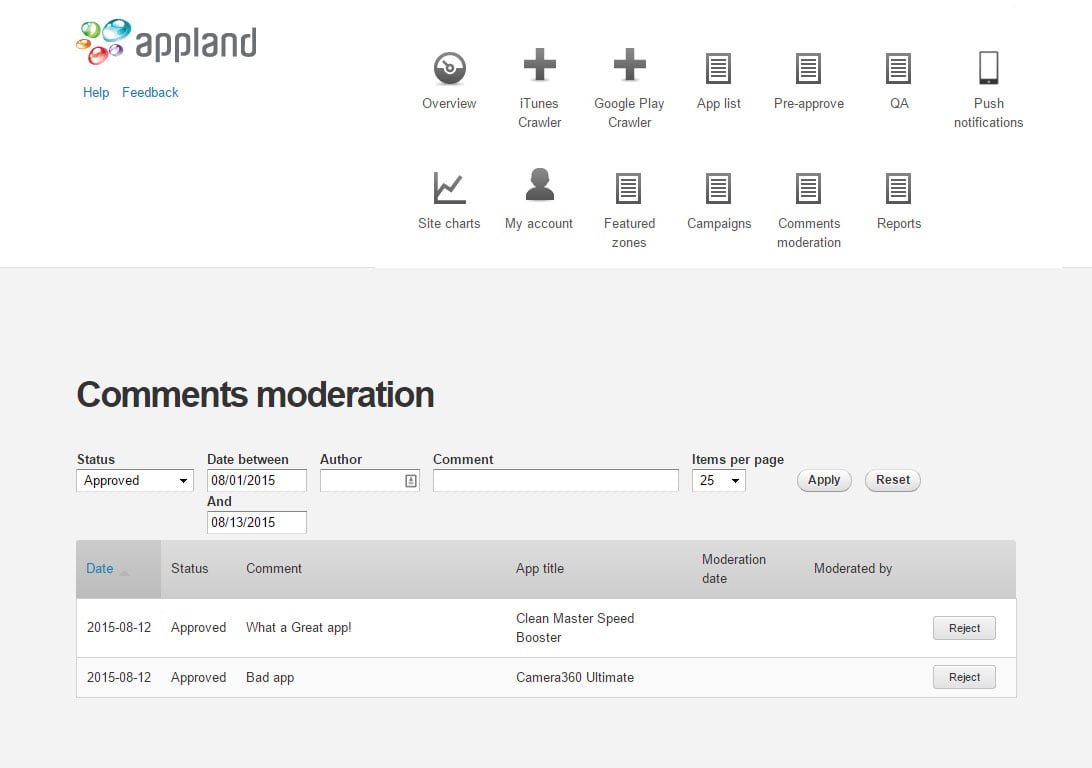
Manage and moderate App Store comments
Manage and moderate App Store comments
End users can rate and comment apps and you as a Store Manager can either reject or approve the comments.
You can filter the comments by:
Status of comment (not moderated, approved or rejected)
Date
Author
Or you can search for a specific comment
The Appland support team can help you to configure your store with your special needs. Comments can be published directly or approved by a store manager before published to other end users.
Previous StepNext Step
Update your account information
Update your account information
View and edit password, bank and personal/company information.
Use the “View” tab to view the current personal/company information
Use the “Edit” tab to edit the information
Previous StepNext Step
Learn more about our features
Purchase a premium app
After installation of the native app store ODP, open the ODP and swipe right to access categories and swipe left for top lists
Click on a premium app and purchase it. Please note that no end user registration is needed and the demo payment means that you will not be charged for purchases.
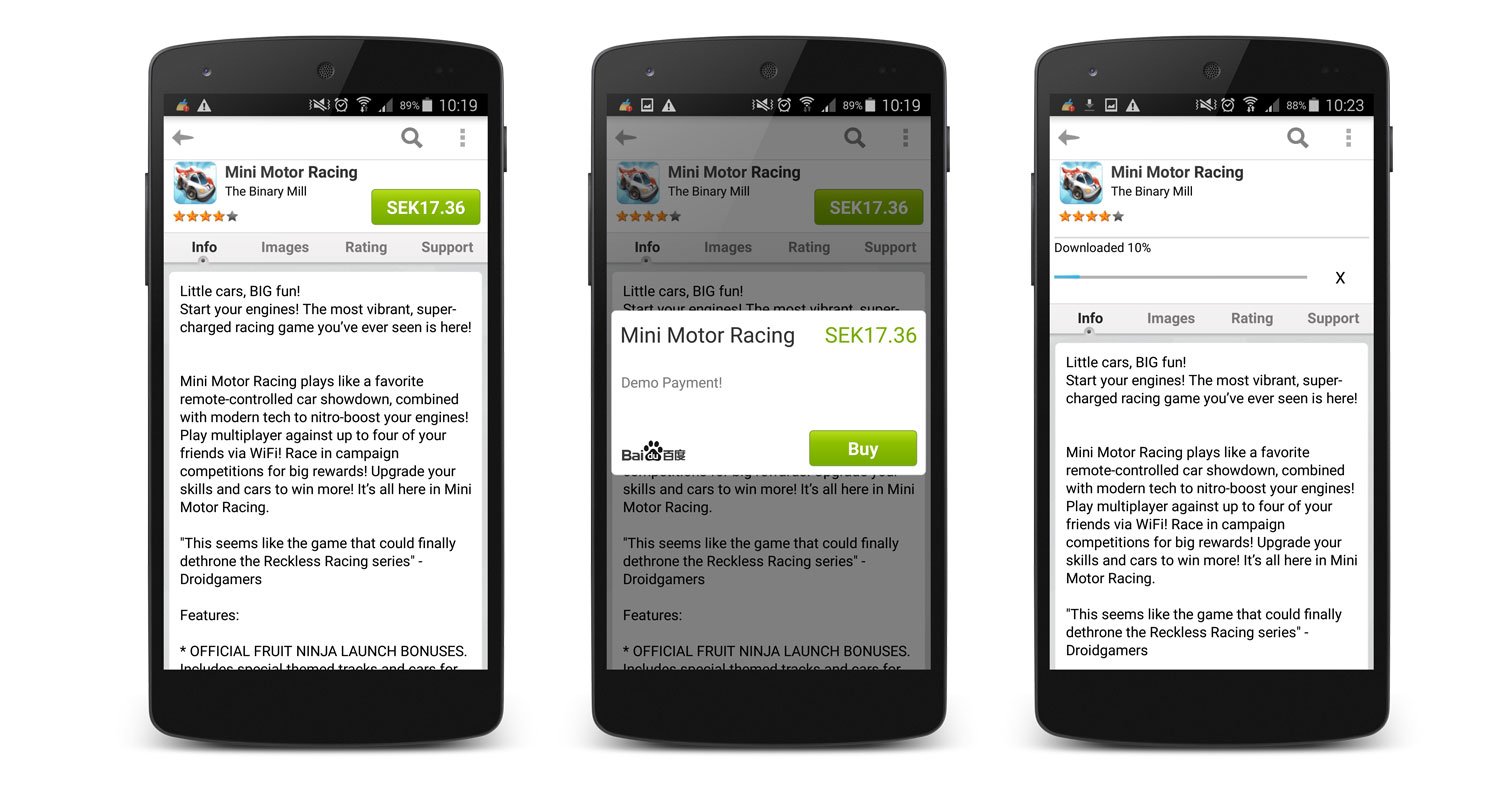
Several billing alternatives exist, including world-wide carrier billing, credit card billing and virtual currency billing.
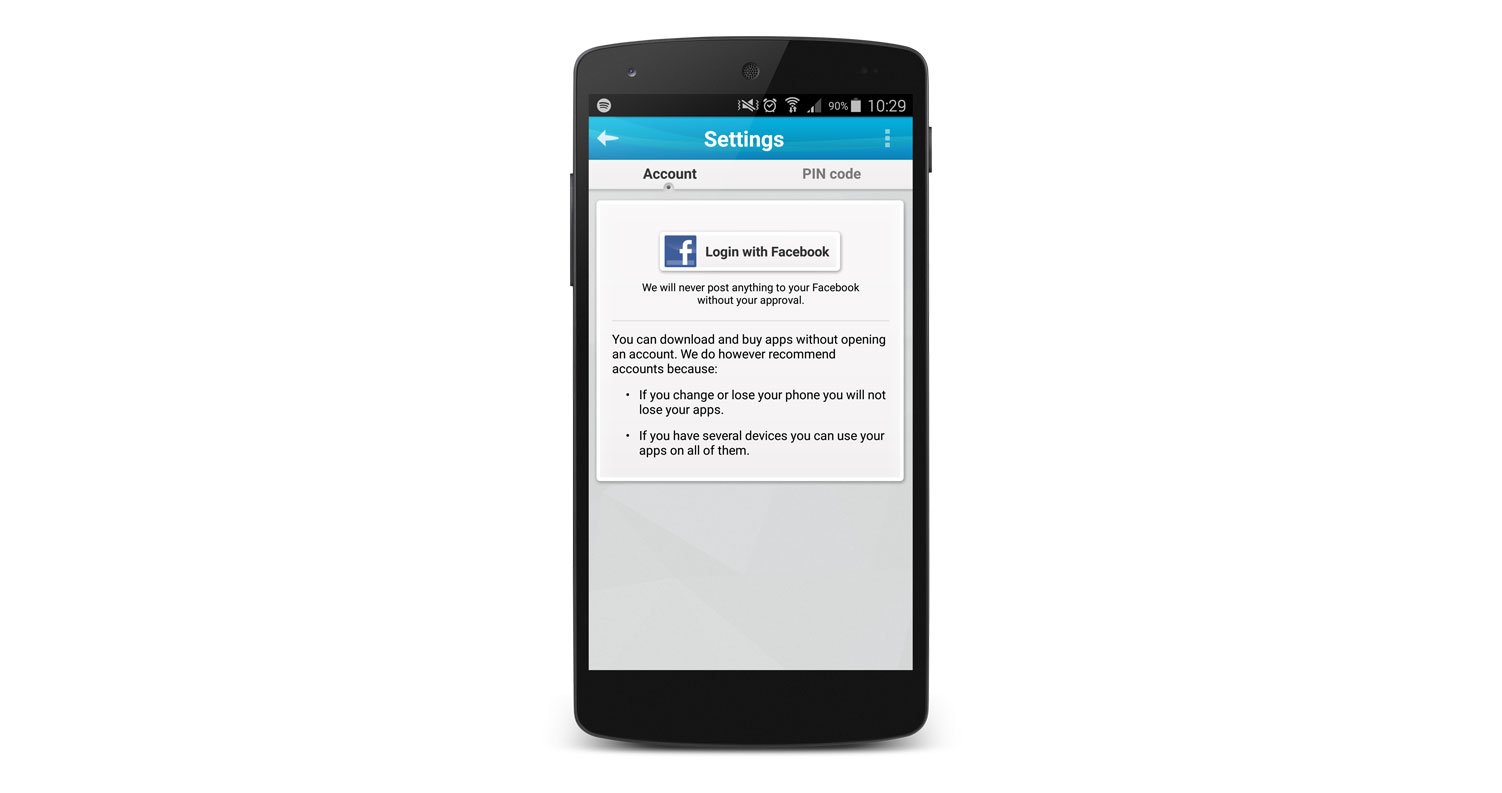
Login with facebook
From the native app store, press the phone’s "MENU" button (or the three dots in upper-right hand corner of the ODP) and go to "Settings" to login via Facebook. Now the user is registered and apps can be transferable to several devices using the same login.
Download the native Android App Store on another Android device (e.g. a tablet) and login to the same account as on the previous device. Now the purchased apps can be transferred to the new device. Press the “MENU” button, then “My apps”, swipe to “Purchased” and then download the previously purchased apps without having to pay again.
Push app from Web Store to ODP
Go to your Web Store and login via Facebook. To push an app to a device, click “Download”, choose the desired device to push app to and then click “Continue”
.png)
Previous Step